.png) 在下余林阳
在下余林阳 2124 字
11 分钟
Arnold猫脸变换和zigzag
#Arnold猫脸变换和zigzag

致敬传奇题型misc。
太搞了,我第一次看见这一题,我就直接上网去搜索了,然后找到一个Arnold猫脸变换。
我还真以为是这种加密方式,然后就照着做了做,结果当然是没有做出来的。
不过也算是提前看到一个我第一次见绝对不会做的题型了。
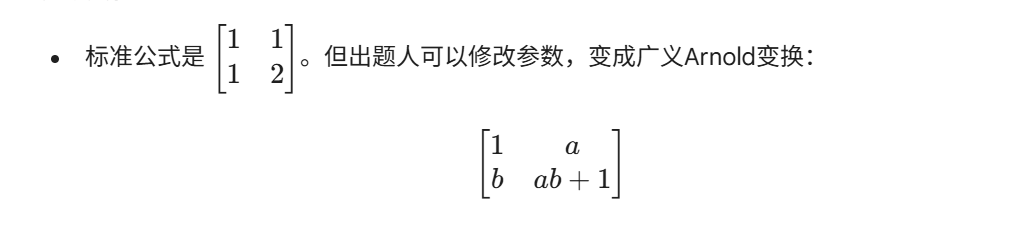
猫脸加密,保证原图的像素点不变,然后假设一个像素点的位置按坐标(x,y),然后转化后边为,这边给出公式 x1=(x+y) mod N,y1=(x+2y) mod N 。
反推得到 x=(2x1-y1) mod N,y=(-x1+y) mod N。
该加密具有周期性,即如果不断按公式变化原图,则在变化一定次数后会回到原来的样子。
解密公式为:
import cv2import numpy as npimport os
def arnold_transform(img, steps=1, encrypt=True): """ 执行Arnold变换 (加密 或 解密) :param img: 输入的图像数组 (numpy array) :param steps: 迭代次数 (密钥之一) :param encrypt: True为加密(正向), False为解密(逆向) :return: 变换后的图像 """ h, w = img.shape[:2]
# Arnold变换通常要求图像是正方形 # 如果不是正方形,通常的做法是裁剪成正方形或只处理正方形区域 # 这里为了演示简单,我们取最小边长进行裁剪 N = min(h, w) img = img[:N, :N]
# 创建一个新的图像用于存放结果 new_img = np.zeros((N, N, img.shape[2]), dtype=np.uint8)
# 生成坐标网格 x, y = np.meshgrid(np.arange(N), np.arange(N))
# 复制坐标以进行迭代 new_x, new_y = x.copy(), y.copy()
# 核心算法 for _ in range(steps): if encrypt: # 正向变换 (加密) # x' = (x + y) % N # y' = (x + 2y) % N next_x = (new_x + new_y) % N next_y = (new_x + 2 * new_y) % N else: # 逆向变换 (解密) # x = (2x' - y') % N # y = (-x' + y') % N next_x = (2 * new_x - new_y) % N next_y = (-new_x + new_y) % N
new_x, new_y = next_x, next_y
# 这里的 new_x, new_y 是原图坐标变换后的目标坐标 # 但在NumPy赋值时,我们需要反过来思考: # 我们希望 new_img[new_y, new_x] = img[y, x] (正向逻辑) # 或者用更高效的掩码赋值方式
# 注意:为了保持向量化操作的直观性,这里直接利用映射关系 # 实际上,上面的计算算出了 (x,y) 移动到了 (new_x, new_y) # 所以 img[y, x] 的像素值应该填入 new_img[new_y, new_x] new_img[new_y, new_x] = img[y, x]
return new_img
def main(): # 1. 准备测试图像 # 如果你没有图片,代码会创建一个简单的测试图 filename = 'test_arnold.png' if not os.path.exists(filename): print("未找到图片,生成测试图片...") test_img = np.zeros((300, 300, 3), dtype=np.uint8) cv2.putText(test_img, "HELLO CTF", (50, 150), cv2.FONT_HERSHEY_SIMPLEX, 1.5, (255, 255, 255), 3) cv2.imwrite(filename, test_img)
original_img = cv2.imread(filename)
# 2. 设置密钥 (迭代次数) KEY_STEPS = 10
print(f"原始图像尺寸: {original_img.shape}") print(f"正在进行Arnold加密 (迭代 {KEY_STEPS} 次)...")
# 3. 加密 encrypted_img = arnold_transform(original_img, steps=KEY_STEPS, encrypt=True) cv2.imwrite('arnold_encrypted.png', encrypted_img) print("加密完成,已保存为 arnold_encrypted.png")
# 4. 解密 print(f"正在进行Arnold解密 (迭代 {KEY_STEPS} 次)...") decrypted_img = arnold_transform(encrypted_img, steps=KEY_STEPS, encrypt=False) cv2.imwrite('arnold_decrypted.png', decrypted_img) print("解密完成,已保存为 arnold_decrypted.png")
# (可选) 显示图像 # cv2.imshow("Encrypted", encrypted_img) # cv2.imshow("Decrypted", decrypted_img) # cv2.waitKey(0)
if __name__ == "__main__": main()注意:
该种加密方式同样存在自定义类型。
接下来登场的是zigzag。
原题是有提示的,打开010eiditor,会发现最底部有一串很明显的数据六,base58解密后得到zigzag。
在ISCTF已经两次因为没看尾部没做出来题目了,其实有一题是工具的问题。
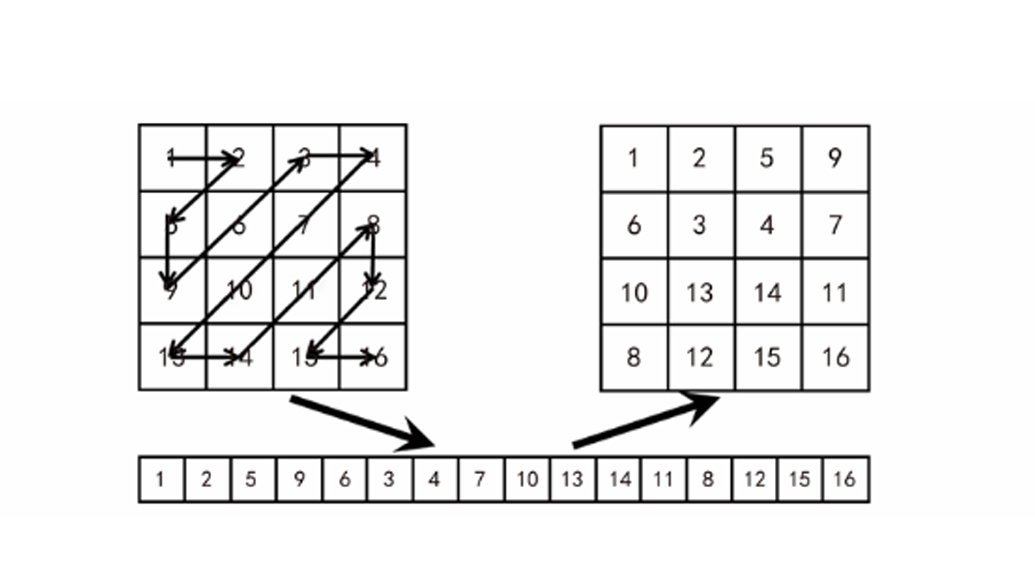
将原理就是将二维数组按照特定的方法读取成一维数组后,再次排列成为二维数组。
这里给的是最标准的形式,存在其他形式。
解密代码:
import numpy as np
def zigzag_scan(matrix): """ 将 NxN 的二维矩阵进行 Zigzag 扫描,转换为一维数组 """ rows, cols = matrix.shape solution = [[] for i in range(rows + cols - 1)]
for r in range(rows): for c in range(cols): sum_idx = r + c # 将同一对角线上的元素收集到同一个桶里 if sum_idx % 2 == 0: # 偶数和:原本是向右上,但在遍历矩阵时, # 同一个sum_idx,r是递增的,所以直接append实际上是存的反向 # 因此偶数层我们需要 insert(0) 或者后续统一反转 solution[sum_idx].insert(0, matrix[r][c]) else: # 奇数和:向左下 solution[sum_idx].append(matrix[r][c])
# 将所有桶合并成一个一维列表 return [num for sublist in solution for num in sublist]
def inverse_zigzag(array, h, w): """ Zigzag 逆变换:将一维数组还原为 h x w 矩阵 (这是解密步骤必须的) """ matrix = np.zeros((h, w), dtype=np.int32) rows, cols = h, w
# 当前填充到的数组索引 cur_idx = 0
# 遍历所有对角线 (和为 0 到 h+w-2) for s in range(rows + cols - 1): if s % 2 == 0: # 偶数对角线:向右上 (r 减小, c 增加) # 确定起点的 r # 如果 s < rows, r 从 s 开始; 否则 r 从 rows-1 开始 r = s if s < rows else rows - 1 c = s - r
while r >= 0 and c < cols: matrix[r][c] = array[cur_idx] cur_idx += 1 r -= 1 c += 1 else: # 奇数对角线:向左下 (r 增加, c 减小) # 确定起点的 c c = s if s < cols else cols - 1 r = s - c
while r < rows and c >= 0: matrix[r][c] = array[cur_idx] cur_idx += 1 r += 1 c -= 1
return matrix
# --- 测试 ---if __name__ == "__main__": # 创建一个 4x4 测试矩阵 test_mat = np.array([ [1, 2, 5, 9], [3, 6, 8, 12], [4, 7, 11, 13], [10, 14, 15, 16] ])
print("原始矩阵:") print(test_mat)
# 1. 扫描 zigzag_1d = zigzag_scan(test_mat) print(f"\nZigzag 扫描结果 (1D): {zigzag_1d}") # 预期结果: [1, 2, 3, 4, 5, 6, 7, 8, 9, 10, 11, 12, 13, 14, 15, 16] # (如果是上面的矩阵数值设计,刚好的顺序应该是递增的,这验证了路径正确性)
# 2. 逆变换 (还原) restored_mat = inverse_zigzag(zigzag_1d, 4, 4) print("\n还原后的矩阵:") print(restored_mat)这个是数据的脚本。
这边还有一个图像像素点的脚本。
import numpy as npimport cv2import os
def zigzag_indices(rows, cols): # 生成 Zigzag 扫描的坐标序列 [cite: 41] indices = [] # 遍历所有对角线,总数为 rows + cols - 1 [cite: 42] for diag in range(rows + cols - 1): if diag % 2 == 0: # 偶数对角线:向右上方遍历 [cite: 43] # 起点 r 为该对角线允许的最大行索引 [cite: 44] r = min(diag, rows - 1) c = diag - r
# 当 r 未越下界且 c 未越右界时循环 [cite: 47] while r >= 0 and c < cols: indices.append((r, c)) # [cite: 50] r -= 1 # [cite: 51] c += 1 # [cite: 52] else: # 奇数对角线:向左下方遍历 [cite: 48] # 起点 c 为该对角线允许的最大列索引 [cite: 53] c = min(diag, cols - 1) r = diag - c
# 当 c 未越左界且 r 未越下界时循环 [cite: 55] while c >= 0 and r < rows: indices.append((r, c)) # [cite: 56] r += 1 # [cite: 57] c -= 1 # [cite: 58] return indices # [cite: 59]
def zigzag_unscramble_2d(matrix_2d): # 针对二维矩阵进行 Zigzag 逆变换 [cite: 60] rows, cols = matrix_2d.shape # [cite: 61] indices = zigzag_indices(rows, cols) # [cite: 63]
# 将矩阵展平,因为加密过程是按 Zigzag 顺序读取后的一维流 [cite: 64, 65] flattened = matrix_2d.flatten()
# 创建全零矩阵用于存放还原后的数据 [cite: 66] unscrambled = np.zeros_like(matrix_2d)
# 将展平的数据按 Zigzag 路径填回原位 [cite: 67] for idx, (r, c) in enumerate(indices): unscrambled[r, c] = flattened[idx]
return unscrambled # [cite: 68]
def zigzag_unscramble_image(img): # 判断图像维度并处理 [cite: 69] if img.ndim == 2: # 灰度图直接处理 [cite: 70] return zigzag_unscramble_2d(img) elif img.ndim == 3 and img.shape[2] == 3: # RGB 彩色图对每个通道分别处理 [cite: 71, 72] unscrambled = np.zeros_like(img) for ch in range(3): unscrambled[:, :, ch] = zigzag_unscramble_2d(img[:, :, ch]) # [cite: 73] return unscrambled # [cite: 74] else: raise ValueError("仅支持灰度图或标准 RGB 彩色图") # [cite: 76]
if __name__ == "__main__": # 设置加密图片路径 (根据题目描述文件名为 enc.png) [cite: 78] encrypted_image_path = "enc.png"
# 检查文件是否存在 [cite: 80] if not os.path.exists(encrypted_image_path): print(f"错误: 找不到加密图像文件 '{encrypted_image_path}'") exit(1)
# 读取图像 [cite: 83] img_bgr = cv2.imread(encrypted_image_path) if img_bgr is None: print("无法读取加密图像,请检查路径或格式是否支持") exit(1)
# OpenCV 默认读取为 BGR,需转换为 RGB 进行处理 [cite: 85] img_rgb = cv2.cvtColor(img_bgr, cv2.COLOR_BGR2RGB) print(f"成功读取加密图像, 尺寸: {img_rgb.shape}") # [cite: 86]
# 执行解密 [cite: 87] decrypted_img = zigzag_unscramble_image(img_rgb)
# 转回 BGR 以便保存 [cite: 88] decrypted_bgr = cv2.cvtColor(decrypted_img, cv2.COLOR_RGB2BGR)
# 保存结果 [cite: 89, 90] output_path = "decrypted_zigzag.png" cv2.imwrite(output_path, decrypted_bgr) print(f"图像已解密并保存为: {output_path}") # [cite: 91]- 版权声明:本文由 余林阳 创作,转载请注明出处。
喜欢这篇文章吗?
点击右侧按钮为文章点赞,让更多人看到!
Arnold猫脸变换和zigzag
https://sliver-yu.cc/posts/arnold猫脸变换和zigzag/
文章最后更新于 2025-12-11